728x90
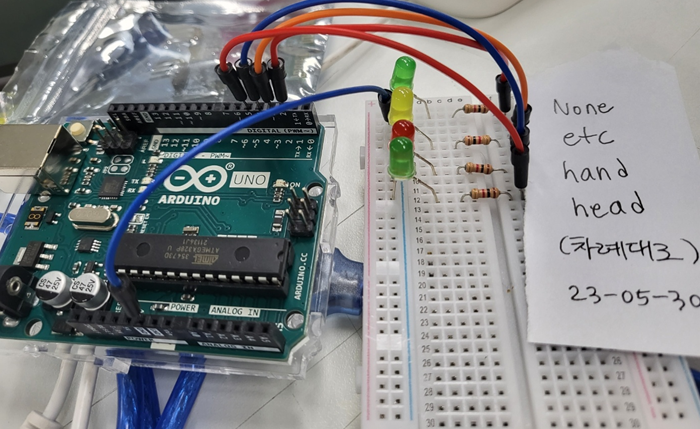
0. 상황 요약
- 노트북에서 파이참으로 python 코드를 돌린다.
- 파이썬으로 작성된 코드를 통해, 파란 시리얼 케이블로 아두이노에 int형 데이터를 보낸다.
- 아두이노가 데이터를 받으면, 그 값을 이용해 LED를 제어한다.
주의점: 파이썬 시리얼 통신 관련 코드를 실행시키고 있는 상태에서는, 아두이노 보드에 업로드하거나 아두이노 시리얼 모니터를 이용할 수 없음.
| 안전 | 위험 | |
| head (100의자리 수) | 0 | 1 |
| hand (10의자리 수) | 0 | 1 |
| etc (1의자리 수) | 0 | 1 |
ex)
모두 안전: '0'
head 위험: '100'
hand 위험: '10'
etc위험: '1'
head, etc 위험: '101'
...
이런 식으로 숫자를 전송한다.
1. 하드웨어 결선

2. 파이썬 코드
- 비디오에서 객체를 탐지
- 해당 객체에 대한 경고음을 재생
- 감지된 객체 정보를 시리얼 통신으로 아두이노에 전송
- 멀티스레딩을 활용하여 동시에 여러 작업을 처리
import cv2
import numpy as np
import torch
import threading
import time
from gtts import gTTS
import os
import pygame
import serial
from time import sleep

# pygame mixer 초기화 (오디오 재생을 위함)
pygame.mixer.init()

# YOLOv5 모델 로드
model_path = 'C:/Users/songs/PycharmProjects/mediapipe/yolov5/data/dataset_230515/230518_/best_SY_230518.pt'
model = torch.hub.load('ultralytics/yolov5', 'custom', path=model_path)

# 객체 탐지 모델의 클래스 이름 불러오기
names = model.module.names if hasattr(model, 'module') else model.names

# 각 객체에 대한 경고 문구 설정
warnings = {
    'head': '머리가 감지되었습니다.',
    'hand': "창 밖으로 손을 내밀지 마세요",
    'etc': '모르는 물체가 감지되었습니다.'
}

# 시리얼 통신 설정
ser = serial.Serial('COM7', 9600)  # COM 포트와 보레이트에 맞게 설정

# 감지된 객체를 저장하는 딕셔너리
detected_objects = {'head': 0, 'hand': 0, 'etc': 0}

# 시리얼 통신으로 데이터를 보내는 함수
def send_data():
    while True:
        message = detected_objects['head']*100 + detected_objects['hand']*10 + detected_objects['etc']
        ser.write(message.to_bytes(1, byteorder='big'))  # 1 byte number to bytes
        sleep(0.5)
        print("Sending:", message)  # 보내는 메시지 출력

# send_data 함수를 별도의 스레드에서 실행시키는 함수
def start_send_data_thread():
    thread = threading.Thread(target=send_data, daemon=True)
    thread.start()

# 오디오 재생 함수
def play_audio(file):
    pygame.mixer.music.load(file)
    pygame.mixer.music.play()

audio_thread = None
audio_end_time = 0

# 비디오 캡처
video = cv2.VideoCapture('final_test.mp4')

# 비디오 파일 또는 카메라가 제대로 열렸는지 확인
if not video.isOpened():
    print('Could not open video')
    exit()

# send_data 함수를 별도의 스레드에서 실행
start_send_data_thread()

while video.isOpened():
    ret, frame = video.read()
    if not ret:
        break

    points = np.array([[361, 28], [565, 79], [719, 115], [870, 164], [996, 238],
                       [1069, 350], [1110, 443], [1023, 521], [904, 556], [768, 608],
                       [552, 698], [515, 539], [462, 353], [404, 173]], dtype=np.int32)

    # 관심 영역(ROI, Region of Interest) 설정 (창문 안쪽을 검정색으로 처리)
    mask = np.ones_like(frame, dtype=np.uint8) * 255
    cv2.fillPoly(mask, [points], (0, 0, 0))
    roi = cv2.bitwise_and(frame, mask)

    # 객체 탐지 실행 (YOLOv5는 RGB 이미지를 기대하므로 BGR을 RGB로 변환)
    results = model(roi[:, :, ::-1])
    labels = results.xyxyn[0][:, -1].cpu().numpy()
    boxes = results.xyxyn[0][:, :-1].cpu().numpy()

    # 감지된 객체에 바운딩 박스 그리기
    for (x, y, w, h, _), label in zip(boxes, labels):
        x1 = int((x - w / 2) * frame.shape[1])  # frame width
        y1 = int((y - h / 2) * frame.shape[0])  # frame height
        x2 = int((x + w / 2) * frame.shape[1])  # frame width
        y2 = int((y + h / 2) * frame.shape[0])  # frame height
        cv2.rectangle(roi, (x1, y1), (x2, y2), (0, 255, 0), 2)
        cv2.putText(roi, names[int(label)], (x1, y1 - 10), cv2.FONT_HERSHEY_SIMPLEX, 0.9, (36,255,12), 2)

    # 감지된 객체 정보 업데이트
    detected_classes = [names[int(label)] for label in labels]
    for object_name in detected_objects.keys():
        detected_objects[object_name] = 1 if object_name in detected_classes else 0

    # 새로운 객체가 탐지되고, 지정된 오디오 재생 시간이 지났을 경우 경고음 재생
    if len(labels) > 0 and time.time() > audio_end_time:
        for detected_class in detected_classes:
            warning = warnings.get(detected_class, warnings['etc'])
            audio_file = f'voice_{detected_class}.mp3'
            if not os.path.isfile(audio_file):  # 파일이 없는 경우에만 TTS를 이용하여 오디오 파일 생성
                tts = gTTS(warning, lang='ko')
                tts.save(audio_file)

            # 오디오 재생 시작 (새로운 스레드에서)
            if audio_thread is not None:
                audio_thread.join()
            audio_thread = threading.Thread(target=play_audio, args=(audio_file,))
            audio_thread.start()

            # 경고음이 끝날 때까지 기다리는 시간 설정
            audio_end_time = time.time() + 3.5  # 가정: 각 경고음은 대략 3.5초 걸림

    cv2.imshow('ROI', roi)
    if cv2.waitKey(1) & 0xFF == ord('q'):
        break

video.release()
cv2.destroyAllWindows()

# 마지막으로 재생된 오디오가 끝날 때까지 기다림
if audio_thread is not None:
    audio_thread.join()

이렇게, 파이참 콘솔 창에도 보내고 있는 값이 뜬다.
3. 아두이노 코드
// LED핀 설정
const int headLED = 2;  // 머리 객체 감지시 점등할 LED 핀
const int handLED = 3;  // 손 객체 감지시 점등할 LED 핀
const int etcLED = 4;   // 그 외 객체 감지시 점등할 LED 핀
const int noDetectionLED = 5;  // 객체 감지가 없을 경우 점등할 LED 핀

void setup() {
  // 핀들을 출력 모드로 설정
  pinMode(headLED, OUTPUT);
  pinMode(handLED, OUTPUT);
  pinMode(etcLED, OUTPUT);
  pinMode(noDetectionLED, OUTPUT);

  // 시리얼 통신 설정
  Serial.begin(9600);  // 9600 baud rate로 시리얼 통신 시작
}

void loop() {
  if (Serial.available()) {  // 시리얼 통신으로 데이터가 들어오는 경우
    int received = Serial.read();  // 시리얼 통신으로 받은 데이터를 읽음
    // 받은 데이터에 따라 각 LED를 제어함
    digitalWrite(headLED, received / 100);  // 머리 객체 감지 정보
    digitalWrite(handLED, (received / 10) % 10);  // 손 객체 감지 정보
    digitalWrite(etcLED, received % 10);  // 그 외 객체 감지 정보
    digitalWrite(noDetectionLED, received == 0 ? HIGH : LOW);  // 객체 감지가 없는 경우 정보
    Serial.println(received);  // 받은 데이터를 다시 시리얼 통신으로 출력 (디버깅용)
  }
}
